You+Team
Table of contents
- Video Introduction to You+Team View
- Team in Nozbe Classic - How Many Nozbe Accounts Can I Have?
- Privacy - Why Can’t I See All of the Projects of My Team Members?
- How to Add a Person to My Team (Create a Nozbe Classic Account for Them)?
- How to Manage Your Team in the You+Team View
- What Else Can I Do in the You+Team View?
- How to View All Your Tasks?
- Can Team Ownership Be Transferred
- Can I Be a Part of More Than One Team in Nozbe Classic
- How to Remove a Team Member and What Effects it Has For The Team?
- Related Free Course: Step 5: Collaboration of “10 Steps to Ultimate Productivity”
Video Introduction to Team View
Team in Nozbe Classic - How Many Nozbe Classic Accounts Can I Have?
- Video Introduction to You+Team View
- Team in Nozbe Classic - How Many Nozbe Accounts Can I Have?
- Privacy - Why Can’t I See All of the Projects of My Team Members?
- How to Add a Person to My Team (Create a Nozbe Classic Account for Them)?
- How to Manage Your Team in the You+Team View
- What Else Can I Do in the You+Team View?
- How to View All Your Tasks?
- Can Team Ownership Be Transferred
- Can I Be a Part of More Than One Team in Nozbe Classic
- How to Remove a Team Member and What Effects it Has For The Team?
- Related Free Course: Step 5: Collaboration of “10 Steps to Ultimate Productivity”
After you’ve set up a Nozbe account for yourself, you can also set up additional Nozbe accounts for your partner, colleagues or students.
Pricing in Nozbe Classic is pretty straightforward. Choose how many users you want to add to your team and pick the best plan for you and your partners.
You can check all the plans on our pricing page.
Nozbe Classic comes with a 30-day unlimited trial - during the trial you can create and remove as many accounts as many people as you want. Later, if you choose Nozbe Classic, you will have to pay for the plan that includes the current number of accounts.
Privacy - Why Can’t I See All of the Projects of My Team Members?
In Nozbe Classic, by default, every new project is private. If you set up an additional account for someone in Nozbe Classic it means two things:
- You’re paying for this person’s account (they’re a part of your Nozbe bill)
- You’ll have it easier to share projects with them
By default, everyone’s projects are private, so even if you’ve created a Nozbe account for someone, you still need to share a project with them to be able to see their tasks in this project.
Your team members will be displayed on the list of people you can share a project with, but you won’t have access to their private projects.
How to Add a Person to My Team (create a Nozbe Classic account for them)?
In the app, go to “You+Team” section. It’s divided into five parts:
1 - You+Team - On the right, you can see how many people are in your team and the number of slots in your account
2 - You - well, that’s you - You can see that you´re the Admin of the team :-)
3 - Your team admins - List of people who have admin role in your team
4 - Your team - people who have accepted your team invitation are your team members.
5 - Sharing projects with - people who have their own, independent from your team, Nozbe Classic accounts but you are sharing projects with them
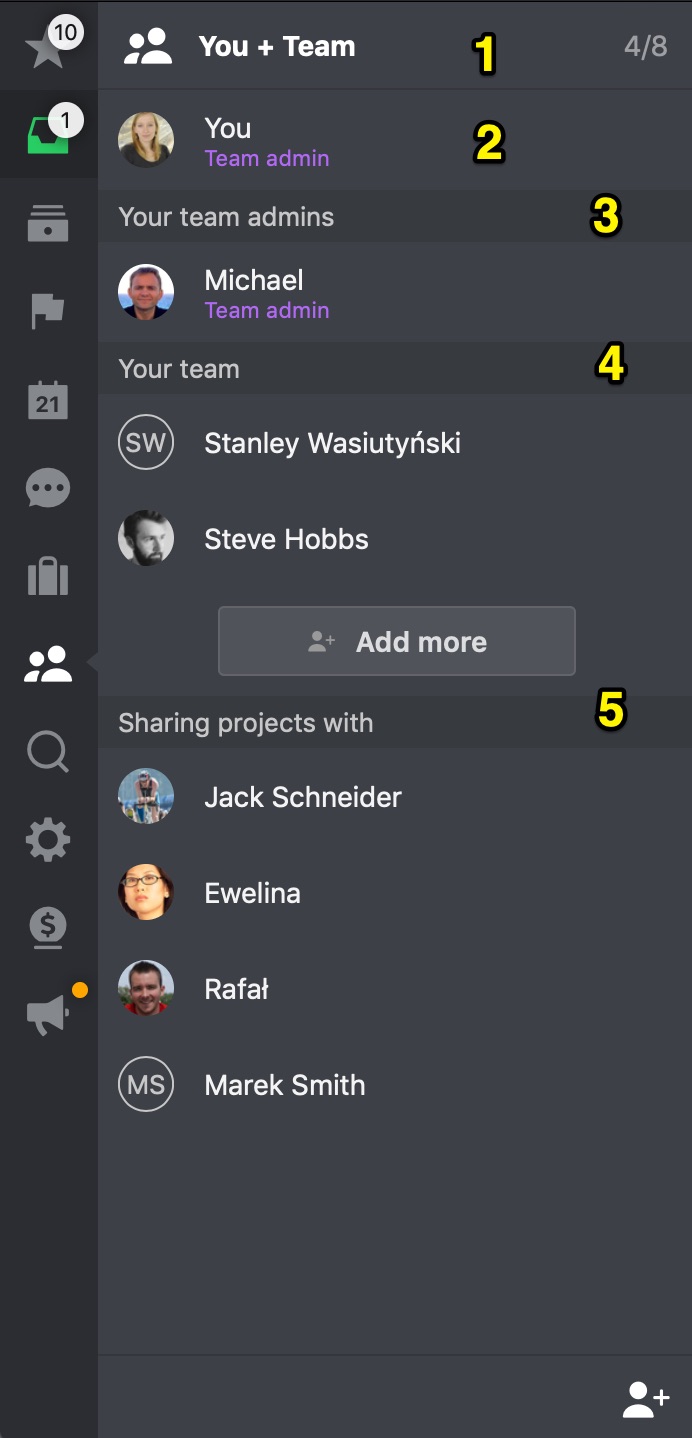
To add a person to your team, just tap on the “+” icon in the bottom right corner (6). Or use the ‘Add more‘ button (7). Enter the email address and confirm with ‘Enter‘.
After you’ve accepted a confirmation screen, this person will receive an invite to create a Nozbe account within your team.
Role in the team
The team owner is always automatically admin of the entire team. They can promote another team member to team admin. In the Premium for 4, 6 and 8 people accounts, you can have up to two team admins and in Premium account for 10 people and more, an unlimited number of admins. You can promote team members to team admin in the Infobar of the team view.
How to Manage Your Team in the You+Team View?
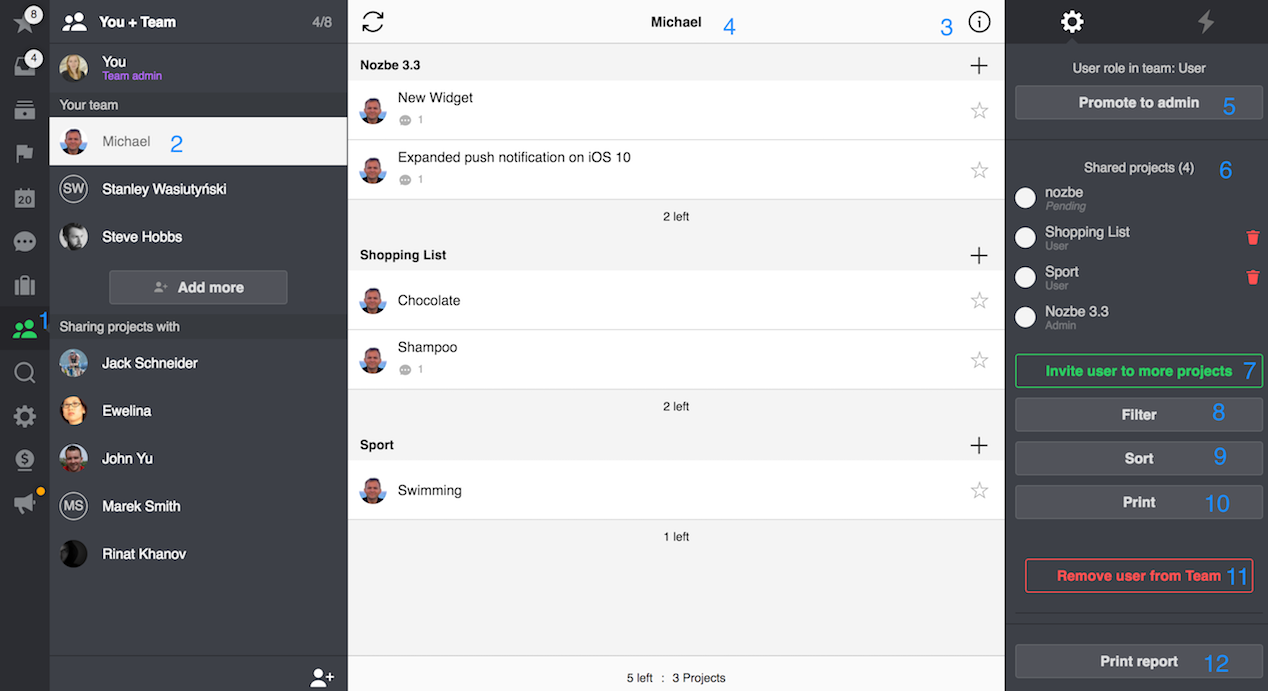
In the “You+Team” section (1), choose a person (2) and go to their Infobar (3). There, you’ll be able to:
- See all tasks delegated to this person in shared projects (4)
- Promote to admin (5) - you see here the current role of this person in your team, and you can promote the selected user to an additional team admin or demote the team admin to a team user again
- See all projects (6) - you’re sharing with the selected user, it is also possible to remove the user from projects you´re sharing with them here. It can be done by clicking on the trash bin icon.
- Invite to more projects (7) - just use this button, select projects from the list; you wish to share with this user and confirm
- Filter (8) - the list of items shared with this user or
- Sort (9) it
- Print (10) - the list of tasks they´re delegated to
- Remove from the team (11) - if you want to remove somebody from your team.
- Print report (12) - you can generate the report and print it

When you choose the “activity” section of the info bar, you’ll be able to follow their recent activity in Nozbe Classic in the projects you’re sharing with them.
What Else Can I Do in the You+Team View?
When you’ve selected a person in the “Team” (1) view, you’ll see all of the tasks delegated to this person from all of the projects you’re sharing with them.
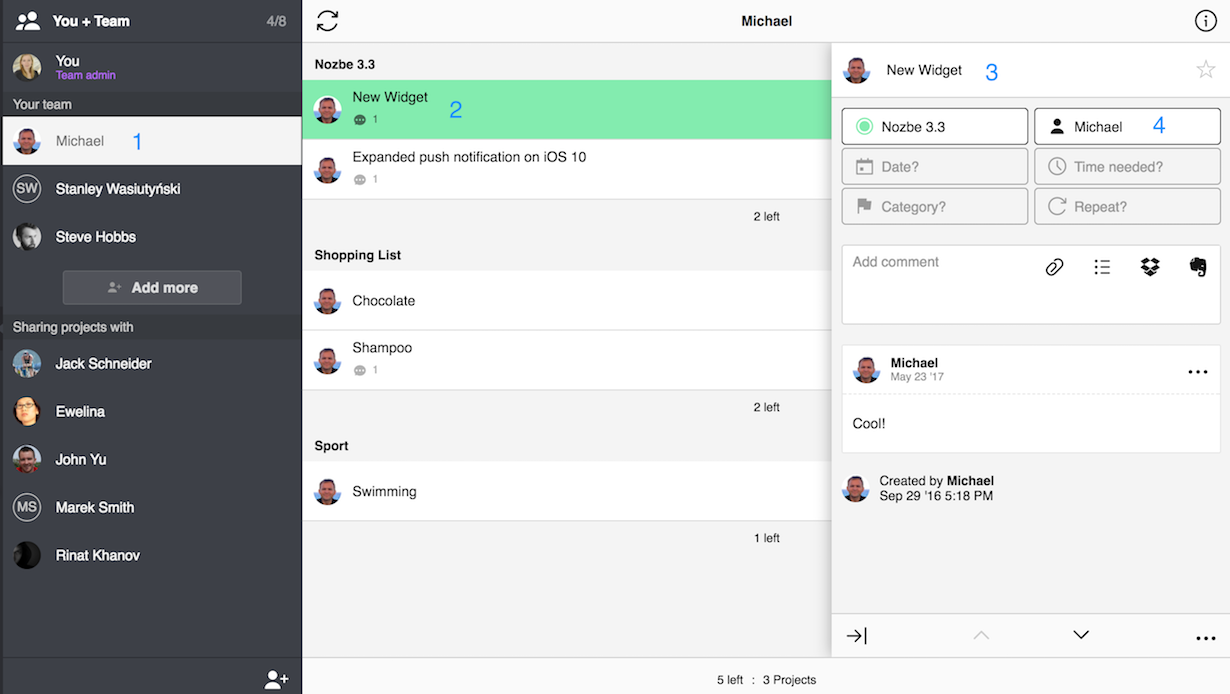
You can choose here any task (2)(3) and make a comment on it, add parameters, delegate it to someone else, you name it (4).
It is an excellent view for managers to see how people they’re working with are doing and what their peers are currently working on.
How to view all your tasks?
When you select ‘You‘ in the You+Team panel, you can see the list of all tasks delegated to you sorted by projects. You can always see the first ten tasks to see more just select the ‘load more‘ button.
This option is available only in trial and paid accounts.
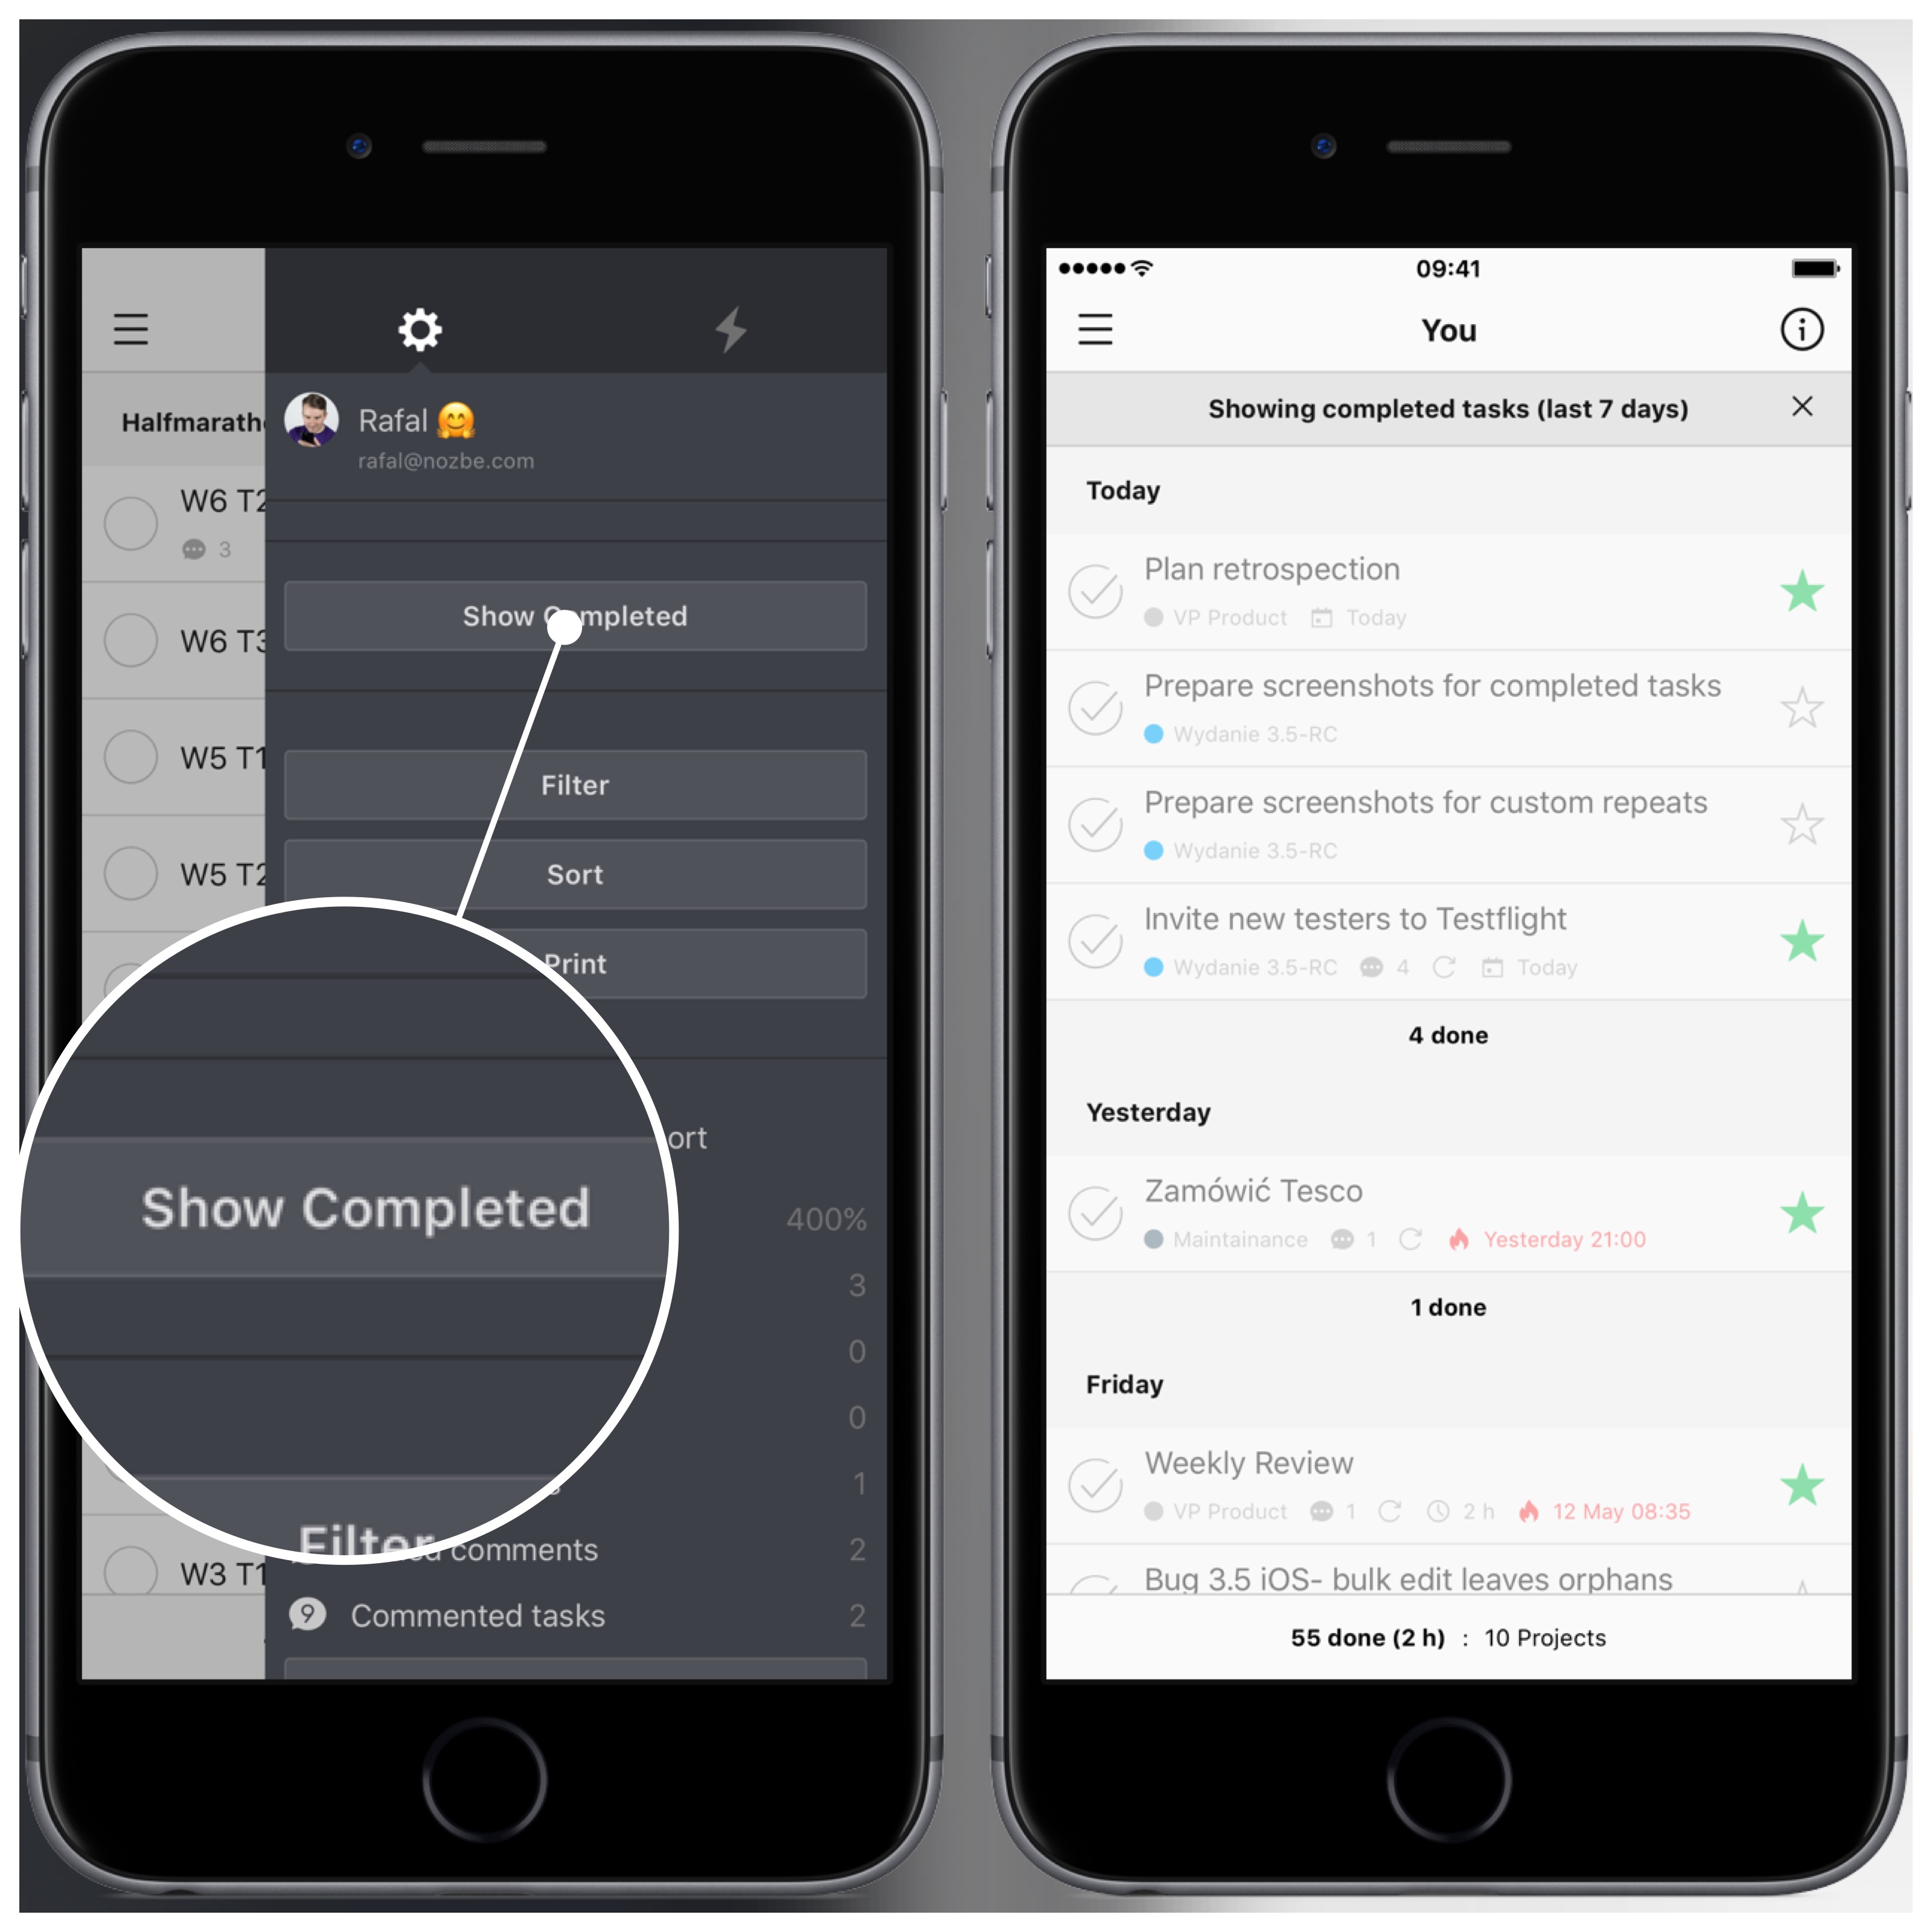
In Nozbe Classic, completed tasks get archived automatically to the server after midnight. That way you can better focus on things you still need to do. But sometimes when you want to review your recent completed task to see how much you accomplished last week or to show it to your boss or just to check how you managed a task recently. In such situation, go to You+Team -> You -> Infobar view in your Nozbe account and select the option to show your completed tasks there. As always, you can print that task list to PDF :)
Can Team Ownership Be Transferred?
In Premium accounts you can promote another user the team admin. The new team admin can add and remove the team members then, and when you leave the team, he´ll be the new owner of team projects when he selects this option while removing you from the team. Do not hesitate to contact our support if you need any assistance.
Can I Be a Part of More Than One Teams in Nozbe Classic?
It is not possible to be a team member in more than one team with the same account at the moment.
However, this doesn’t mean you cannot share projects with other teams. The other team owner can invite you to their projects and work with their team in these projects. You’ll be visible in the “sharing projects with” section of their Nozbe Classic team.
It simply doesn’t matter in Nozbe Classic if you’re a part of a team or not, sharing projects is independent of team memberships.
How to Remove a Team Member and What Effects it Has For The Team?
Team configuration may change. People you once worked with may have gone their separate ways, and you would like to either remove them from the team or replace them with someone else.
Let’s start with the fact that only the owner or the admin of the team can remove anyone. How to do so? Go to your You+Team view, choose the person by clicking their name, and then get to their details by using the [i] icon from the top bar. You will see there an option “remove from the team”. In the next window which appears then, you can remove this user from all projects you´re sharing with him or/and from all project shared from/with this person within the team.
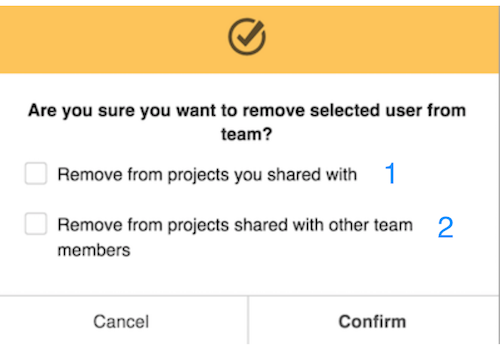
Before you confirm, please select (1) when you wish to remove this person from all project you´re sharing with or/and (2) from all projects shared with this person within the team
What are the results?
Well, you stop paying for that person, and you have one free slot on your team. But it does not automatically remove them from the projects that you or the other team members shared with them. That is why you need to choose option 1, 2 or both.
You can also do that in that user’s info bar (“i” icon) in the “You + Team” view. Just click on the trashcan icons next to the displayed project names. Once the user is removed, you will still see what he has done in a given project, but it will be assigned to ‘unknown’.
What happens when you are the one removed from a team?
Your account will be changed to trial and will be valid for 30 days. You will still have access to your own private projects. You can then decide whether you want to purchase one of Nozbe Classic plans or downgrade your plan to a free one. You can also close your account in the Settings.
Please note that if you need to, you can also change your e-mail address.


